Sunday, September 30, 2007

Blind Contour and Contour Drawings

Blind contour drawing- The students, fixing their eyes on the outline of the model or object, draw the contour very slowly in a steady continuous line without lifting their pencils or looking at the paper. The students may look at their papers to place an internal feature, but once they begin to draw they do not glance down, but follow the same procedure as for the outline. From Wikipedia

Contour drawing - Drawing in which contour lines are used to represent subject matter. A contour drawing has a three- dimensional quality, indicating the thickness as well as height and width of the forms it describes. Making a contour drawing with a continuous line is a classic drawing exercise (sometimes modified as a "blind continuous-line contour"): with eyes fixed on the contours of the model or object, drawing the contour very slowly with a steady, continuous line, without lifting the drawing tool or looking at the paper.
from http://www.artlex.com/ (There are also some excellent examples of contour drawings with the definition!)

The basic idea of blind contour drawing is to not watch your hand as it draws but to have your hand mimic the movement of your eyes as they follow the edges of the object being drawn.

I don't really use blind contour drawings as an assignment to be marked but they are an excellent way to train your students' hands to draw what their eyes really see rather than what they think they see. You may still choose to mark all of the blind and regular contour drawings a student does as one assignment.

The blind contour drawings may not look like much more than a scribble at first but as you and/or your students continue to do them you will begin to see an actual likeness of the object begin to appear in your drawings.

I find getting kids to stay true to the idea of not looking at their papers while doing blind contour drawings a difficult task. My solution was to have them work in white crayon on white paper. When they finish their drawings in white crayon they are permitted to "illuminate" it with a wash of colored tempera or water color paint. When I did this lesson we started with blind contours and then worked on contour drawings with pencil afterwards. There was a marked improvement in my students' drawings afterwards. You may still need to remind students to keep their eyes on what they are drawing!

What You Need:

Blind contour

  • White crayons (you can use white pastels but they can be seen on the paper)
  • White Paper
  • Everyday Objects (shoes, plants, desks, pencils etc.)
Contour
  • Pencils (If you can let students experiment with actual art pencils which have varied softness and hardness rather than the usual HB do so! I have found art pencils at dollar stores and while they aren't artist quality, they will give the students a chance to use the kinds of tools artists use.)
  • Paper
  • Everyday objects

What You Do:

  1. I like to go over the definitions of contour and blind contour drawing for students and show them some examples that I have done or that I have found before I ask students to attempt the work themselves.
  2. I always get students to do the blind contours first, so they will need only white crayons and paper to begin with. I then ask students to pick an object in the room and then pick a point on the object where the eye can begin its slow movement around the contour. You will have to remind students that the eye and hand need to move slowly!
  3. As your eye moves, so should your hand holding the pencil. Try to mimic the movement of your eyes on the object with your hand on the paper. Don't look at your drawing and try to draw without ever disconnecting your pencil from the paper.
  4. Do a color wash over the crayon so you can see the drawings. Names on papers are really important here!
  5. For the contour drawings, have students repeat the steps for blind contour as much as they can but this time they can use pencil and look at the drawing occasionally. NO ERASERS!
You can generally tell when a student has not followed the instructions for contour drawing because the lines are "feathered" rather than a single continuous line. I ask students to keep the first drawing but to also do another drawing with a more continuous line. This way they know that all their efforts are valued but that you are asking them to do the exercise properly for a good reason.

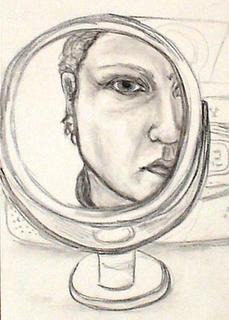
I've added the following pics of blind contours I did in high school as examples. (There are also a number of more recent contour and blind contour drawings on this blog.)

the first two drawings are different views of the same image, I had to play with the contrast and color saturation to make the image more visible. They were my attempts at drawing a blind contour of a friend's face with white crayon. Blind contour portraits can be a lot of fun but you really need to know your kids well and know that they all have a sense of humor!

The last is a blind contour of my boot in charcoal on paper. Charcoal is messy but is wonderful to work with... a box of it is cheap but it will make a big mess so smocks and clean up time would be necessary!

Wednesday, September 26, 2007

Drawing on Gustav Klimt

I have a number of posters I have made with artist biographies and images of art works that I show students when we do assignments. This brings a certain authenticity to the image making of the students when they are working in the style of "real artists". I like to begin the lesson with a short introduction to the artist and let the students view the artist's work.
I used my poster with images by Klimt and a short biography of him prior to this lesson. I recommend making your own poster, as many of Klimt's works that can be found on gallery websites may not be appropriate for school use.

This lesson is adapted from a simpler lesson on kinderart.com.
Symbols with Klimt

Rubric for Marking

Again I have used Google Docs to publish a rubric I developed for art assignments. Marking art assignments is a rather distasteful task in my mind, because it can be so subjective. This rubric was my solution. I used the same rubric for all major assignments. This helped the students become familiar with my expectations and kept my marking consistent but allowed for all students to do well on assignments if they chose to do so. I think this helped to make my art lessons accessible to all students regardless of their natural talent or initial interest.

Art Rubric

I forgot to mention, I used the rubric generator at Teachnology.

Value and Shading

I have used Google Docs to publish a worksheet I made for a later drawing lesson- Value and Shading.

I like to discuss the meaning of "value" with students and what shading does to enhance a drawing prior to giving them the worksheet. the definitions are on the worksheet and they come form artlex.com.
I also try model a simple value scale, some shading, hatching and cross hatching on the board for students. Hatching is intersecting vertical and horizontal lines while cross hatching is intersecting diagonal lines. Modelling or showing examples to the students gives them visual reminders rather than just oral explanations.

The link should take you to the document and you should be able to print it out for classroom use.
Shading and Value

Drawing and Symbols


Introduction to Drawing

For me, drawing is the language of symbols.
Wri
tten languages are based on drawings or pictograms.
Hieroglyphics were a form of
written language that used pictures.

Drawing- Depiction of shapes and forms on a surface chiefly by means of lines. Color and shading may be included. A major fine art technique in itself, drawing is the basis of all pictorial representation, and an early step in most art activities. Though an integral part of most painting, drawing is generally differentiated from painting by the dominance of line over mass. (definition from artlex.com)

Rather than draw things how we actually see them we tend to draw symbols- until we have trained our hands, brains and eyes to work together.

I like to talk with my students about symbols and how when we are young we begin drawing by using symbols to represent what we see.

1.When we are very young we draw an eye as a dot

2.A bit older we draw it as a circle with a dot in it

3.Even older we draw it as an almond shape with a circle and a dot. Maybe add eyelashes and an eyebrow.

Most people stop developing their drawing ability here (around the ages of 10 and 11). BUT if you go further and continue to develop your drawing skills you can begin to draw things less symbolically and more realistically

I model examples of this as we are having this discussion. I've included a picture because while I draw the symbol and the more naturalistic eye, I don't expect everyone to draw them. (I do encourage you to make your own examples for each lesson. It helps you understand what you are teaching and helps you recognize the struggles your students may have as well.)

I ask the students which eye looks more real. Even though both eyes are abstract versions of a real eye, one is more naturalistic (naturalism is when the object looks more real but still some level of abstraction as opposed to realism where the item looks almost identical to real life).

The eye to the left is more abstract, it portrays a more simplified idea of an eye. The eye to the right is more complex and also portrays the idea of an eye but with more depth and shape, more similar to a real eye.

If students need more examples I often get a student to draw the next symbol on the board, usually a tree. I then draw a more naturalistic tree (an example from an artist could be used here instead of your own drawing).

Progression of drawing

Abstract--> Naturalistic--> Realistic--> Abstract

Picasso had made the transition to realism by the age of 12 and began to experiment with more abstract forms as he got older.

I have added this example:

Study of a Torso, After a Plaster Cast,
1893/1894, Musée Picasso, Paris

Whether you share it or not is your choice. Picasso was born in 1881, so he was 12 or 13 when he drew this.


The exercise is to fill a normal white sheet of paper (or at least as many as they can think of) with all of the symbols for things that they have used. The symbols also need to be labelled.
I look for some specific symbols common in younger children's drawings like: eye, tree, heart, hand, person, sun, moon, grass, flower, dog and cat. Feel free to add your own to the list!

This lesson is a good introduction to contour and gesture drawing as the purpose of this lesson is to help students to begin to recognize the symbols they have used and encourage them to question their own mark making for future assignments.